Charcoal is a beautiful and forgiving medium. With it you can achieve rich tones and contrast. It is excellent for both quick gestural studies and highly detailed finished work. The downside I have found (besides its inherent messiness) is that it is easy to use large amounts of charcoal very quickly. When in college, I found that buying even small quantities of ready-made charcoal could be prohibitively expensive depending on brand. This seemed somewhat silly to me, considering how basic charcoal is as a material. So I set out to make some of my own, and found myself incredibly happy with the results.
The first step of making your own charcoal is gathering wood suitable for it. Willow is a popular and traditional choice, yet it is not your only option. On the contrary, I recommend you experiment with using a variety of different species. Different types of wood will give you charcoal with different qualities and tones. I simply gathered sticks from my family’s property, looking for older dried out pieces. One key tip is to use wood without bark to get charcoal that is consistent and easy to work with. I found that pine works especially well for this, as pine seems to lose its bark naturally upon dying and drying out. The particular pine I used also produced charcoal with a nice warm tone to it, created rich blacks, and was easy to work with. When gathering your sticks, be sure to get wood of various sizes, so that you have large pieces suitable for blocking in large areas as well as smaller ones suitable for fine details. However, be careful not to get carried away, as very large pieces may be more difficult to char all the way through.
Once you have completed the first step, you will need to create a barrier to protect the wood from being outright burned. I have found that two to three layers of aluminum foil carefully wrapped around the bundles of wood works very well. Other options include metal containers, such as a coffee can. Just be sure that the container does not contain any burnable parts such as a plastic lid. Aluminum foil could be used as a makeshift lid in this case.
In order to turn your gathered sticks into charcoal, you’ll need a source of heat outdoors. I used a fire pit, built a fire and waited for it to create plenty of hot coals. I let the flames die down and carefully placed the bundles of wood in the ashes, covering them with both the hot ash and coals. I then added more wood on top of this as fuel for the fire. These are important precautions because open flames will burn holes in the aluminum foil if they come into direct contact with it. This could result in your gathered sticks turning to ash rather than charcoal.
The next task is to simply wait. I tend to add small amounts of wood for the next couple of hours to keep the fire going. Then I let the fire die, and cover the remaining embers with ash. This should help lock in the heat of the coals. I allow the hot ash and coals to cool and transform the sticks into charcoal overnight. Be sure to check on your project now and then, and do not leave easily combustible materials near your fire, even if flames are no longer visible. A single hot coal can be very good at lighting a new fire.
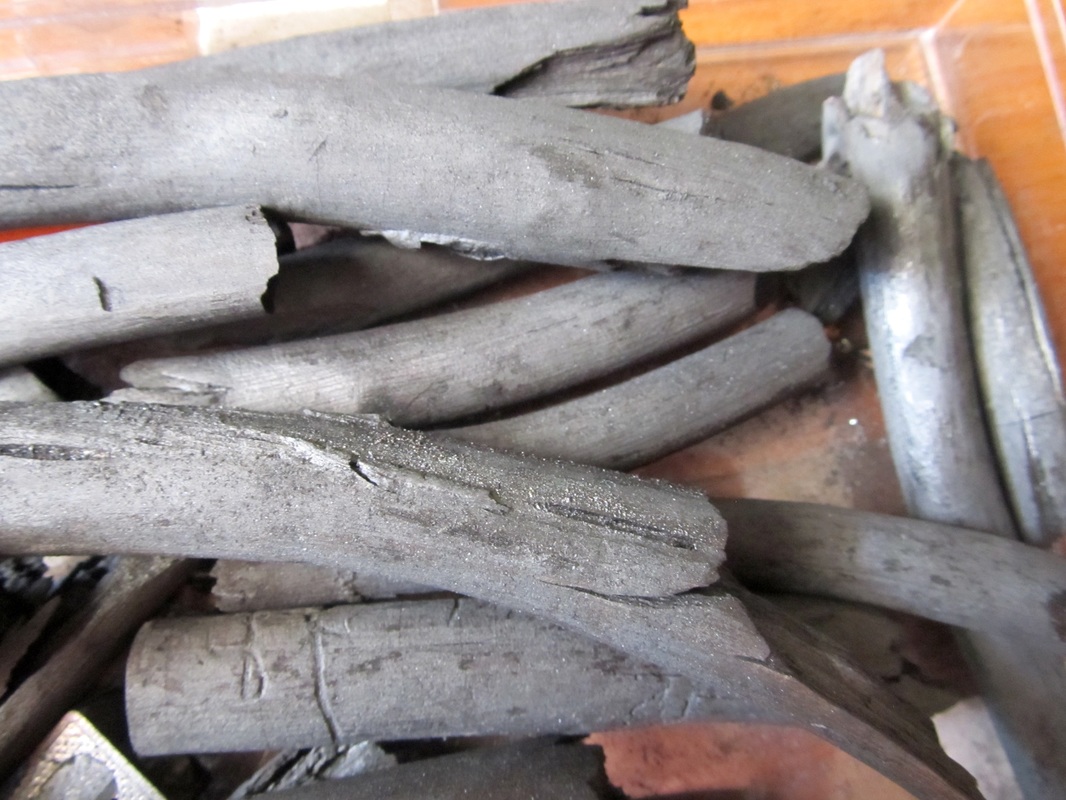
In the morning, carefully dig your bundles out of the ashes. Take care as things could still be hot! Check the progress of the charcoal by breaking one of the larger pieces in half. It should be black all the way through. Another good test is to try it out on a scrap piece of paper. If some of the wood still hasn’t changed into charcoal, you can simply rewrap them, place them back in the ashes, rekindle the fire, and let them “cook” a while longer.
To store your new charcoal, simply keep them somewhere dry and in a container you don’t mind getting dirtied by charcoal dust. Not only can you use your homemade charcoal as a drawing medium, but it can also be used as an ingredient in making your own ink for printmaking projects. Then there is also the fact that homemade charcoal is far more economical. Without the restraints of price, it is much easier to practice and create to your heart’s content. The process of making charcoal is not difficult, and there is something very enjoyable in creating materials for your artwork.
I hope you found this article helpful and that you have fun using your new charcoal! Feel free to comment, or follow me on social media by using one of the links on the right hand side of the page. Thank you for reading!
Once you have completed the first step, you will need to create a barrier to protect the wood from being outright burned. I have found that two to three layers of aluminum foil carefully wrapped around the bundles of wood works very well. Other options include metal containers, such as a coffee can. Just be sure that the container does not contain any burnable parts such as a plastic lid. Aluminum foil could be used as a makeshift lid in this case.
In order to turn your gathered sticks into charcoal, you’ll need a source of heat outdoors. I used a fire pit, built a fire and waited for it to create plenty of hot coals. I let the flames die down and carefully placed the bundles of wood in the ashes, covering them with both the hot ash and coals. I then added more wood on top of this as fuel for the fire. These are important precautions because open flames will burn holes in the aluminum foil if they come into direct contact with it. This could result in your gathered sticks turning to ash rather than charcoal.
The next task is to simply wait. I tend to add small amounts of wood for the next couple of hours to keep the fire going. Then I let the fire die, and cover the remaining embers with ash. This should help lock in the heat of the coals. I allow the hot ash and coals to cool and transform the sticks into charcoal overnight. Be sure to check on your project now and then, and do not leave easily combustible materials near your fire, even if flames are no longer visible. A single hot coal can be very good at lighting a new fire.
In the morning, carefully dig your bundles out of the ashes. Take care as things could still be hot! Check the progress of the charcoal by breaking one of the larger pieces in half. It should be black all the way through. Another good test is to try it out on a scrap piece of paper. If some of the wood still hasn’t changed into charcoal, you can simply rewrap them, place them back in the ashes, rekindle the fire, and let them “cook” a while longer.
To store your new charcoal, simply keep them somewhere dry and in a container you don’t mind getting dirtied by charcoal dust. Not only can you use your homemade charcoal as a drawing medium, but it can also be used as an ingredient in making your own ink for printmaking projects. Then there is also the fact that homemade charcoal is far more economical. Without the restraints of price, it is much easier to practice and create to your heart’s content. The process of making charcoal is not difficult, and there is something very enjoyable in creating materials for your artwork.
I hope you found this article helpful and that you have fun using your new charcoal! Feel free to comment, or follow me on social media by using one of the links on the right hand side of the page. Thank you for reading!
 RSS Feed

